Update September, 2024. Activities and notes while developing the I2S interface for my radio node.
29,30/09/2024 → no progress
28/09/2024 → audio in works
27/09/2024 → RoLink works on audio out
26/09/2024 → Svxlink setup
26-27/12/2024 → presentation for YO5D QTC
Real-time dmesg display
$ dmesg -wH
Remove RPi package
apt-get remove packagename
will remove the binaries, but not the configuration or data files of the package packagename. It will also leave dependencies installed with it on installation time untouched.
apt-get purge packagename or apt-get remove –purge packagename
will remove about everything regarding the package packagename, but not the dependencies installed with it on installation. Both commands are equivalent.
Particularly useful when you want to ‘start all over’ with an application because you messed up the configuration. However, it does not remove configuration or data files residing in users home directories, usually in hidden folders there. There is no easy way to get those removed as well.
apt-get autoremove
removes orphaned packages, i.e. installed packages that used to be installed as an dependency, but aren’t any longer. Use this after removing a package which had installed dependencies you’re no longer interested in.
aptitude remove packagename or aptitude purge packagename (likewise)
will also attempt to remove other packages which were required by packagename on but are not required by any remaining packages. Note that aptitude only remembers dependency information for packages that it has installed.
From: https://askubuntu.com/questions/187888/what-is-the-correct-way-to-completely-remove-an-application
Check wlan0 up
#!/bin/bash

state=$(cat /sys/class/net/wlan0/operstate)

if [ $state = "up" ]; then
echo 1 > /sys/class/gpio/gpio27/value
else
echo 0 > /sys/class/gpio/gpio27/value
fi;
or, in /lib/dhcpcd/dhcpcd-hooks/05-wifiled:
# light led while Wi-Fi is connected
echo 17 > /sys/class/gpio/export
echo out > /sys/class/gpio/gpio17/direction
case "$reason" in
CARRIER)
  echo 1 > /sys/class/gpio/gpio17/value
   ;;
 NOCARRIER)
  echo 0 > /sys/class/gpio/gpio17/value
   ;;
esac
from https://forums.raspberrypi.com/viewtopic.php?t=224423
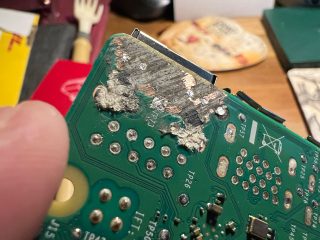
Audio Level ?
Never assume the input level is mic level !!!
Instead, line level was needed. Recording function was ok, the mic audio level was too low.
GPIOD
Controlling SVXlink with GPIOD. See more here: https://lloydrochester.com/post/hardware/libgpiod-intro-rpi/
sudo apt install gpiod
Alsamixer softvol
More here: https://alsa.opensrc.org/How_to_use_softvol_to_control_the_master_volume
Open the .asoundrc file in your favorite editor. E.g. like this:
nano ~/.asoundrc
Now we create a new softvol device be typing:
pcm.softvol {
    type            softvol
    slave {
        pcm         "<device name>"
    }
    control {
        name        "<control name>"
        card        0
    }
}
This will create a new PCM device called softvol, which is controlled by a volume control <control name> and which will pass the sound data with the changed volume to its slave <device name>.
You have to replace <device name> with the name of the device you determined above and <control name> with what you want to call your new volume control, e.g. SoftMaster. If your card does not have a master volume control at all, you’re lucky, because you can name your new volume control Master and your new control works like a master volume control is supposed to. To find out, whether such a control exists, run:
amixer controls | grep Master
If this command lists a control named
Master, you should not name your new control like this. Unfortunately, existing controls can’t be overwritten, so you have to pick a name like SoftMaster. This control will now control everything, but as it is not called Master, mixers (like KMix) won’t use it to control master volume, unless you can make them choose another control (like GMix).
The name you give to your control matters a lot. Some suffixes have special meanings. For example, if you want your softvol to control the playback volume only, the control name must end with Playback Volume. Such a name prevents the mixer from showing it as a capture control.
Now test your new device with:
speaker-test -Dsoftvol -c<channel count> -twav
Note: The new volume control won’t appear immediately! Only after the first usage of the newly defined device (e.g. with the command above), should amixer controls | grep <control name> display your new control. Mixers that were already started before the first usage (like KMix) have to be restarted to adopt the changes. If you still don’t see the new control, try restarting ALSA or your PC.
Reflector Logic
Does not work without:
TYPE=ReflectorV2
Mount USB stick
mkdir /home/tom/usbstick
mount /dev/sda1 /home/tom/usbstick
Samba installation
sudo apt install samba samba-common-bin
sudo nano /etc/samba/smb.conf
[pishare]
path = /shared
writeable = yes
browseable = yes
create mask = 0777
directory mask = 0777
public = no
In brackets, in our example [pishare], you can provide the name as the folder will appear on connected computers. If besides specific users you also want to enable guest access, add the line Guest ok = yes.
Now we want to set a Samba password, which can be the same as your standard password:
sudo smbpasswd -a pi
Finally restart the samba service for the changes to take effect:
sudo systemctl restart smbd
Removing SSH error
[user@hostname ~]$ ssh root@pong
@@@@@@@@@@@@@@@@@@@@@@@@@@@@@@@@@@@@@@@@@@@@@@@@@@@@@@@@@@@
@ WARNING: REMOTE HOST IDENTIFICATION HAS CHANGED! @
@@@@@@@@@@@@@@@@@@@@@@@@@@@@@@@@@@@@@@@@@@@@@@@@@@@@@@@@@@@
IT IS POSSIBLE THAT SOMEONE IS DOING SOMETHING NASTY!
Someone could be eavesdropping on you right now (man-in-the-middle attack)!
It is also possible that a host key has just been changed.
The fingerprint for the RSA key sent by the remote host is
6e:45:f9:a8:af:38:3d:a1:a5:c7:76:1d:02:f8:77:00.
Please contact your system administrator.
Add correct host key in /home/hostname /.ssh/known_hosts to get rid of this message.
Offending RSA key in /var/lib/sss/pubconf/known_hosts:4
RSA host key for pong has changed and you have requested strict checking.
Host key verification failed.
The solution is to remove known_hosts profiles.
ssh-keygen -R
Aplay command
aplay -vv -D hw:0,0 48after_midnight.wav
Arecord command
arecord -D hw:2,0 test5.wav -f S16_LE -r48000 -c 2 -d 10
How to check for recording hardware parameters
arecord -D hw:2,0 –dump-hw-params
provides:
Recording WAVE ‘stdin’ : Unsigned 8 bit, Rate 8000 Hz, Mono
HW Params of device “hw:2,0”:
——————–
ACCESS: MMAP_INTERLEAVED RW_INTERLEAVED
FORMAT: S16_LE S24_LE S32_LE
SUBFORMAT: STD
SAMPLE_BITS: [16 32]
FRAME_BITS: [32 64]
CHANNELS: 2
RATE: [8000 384000]
PERIOD_TIME: (5 8192000]
PERIOD_SIZE: [2 65536]
PERIOD_BYTES: [16 524288]
PERIODS: [2 65536]
BUFFER_TIME: (10 16384000]
BUFFER_SIZE: [4 131072]
BUFFER_BYTES: [16 524288]
TICK_TIME: ALL
——————–
arecord: set_params:1343: Sample format non available
Available formats:
– S16_LE
– S24_LE
– S32_LE